At the end of last year, a copy of 86-DOS 0.11 for the Cromemco 4FDC controller surfaced. It is the earliest released version of 86-DOS, the earliest operating system for the x86 architecture. Having done some legacy work dealing with real mode x86 before, I thought I could maybe challenge myself and build a copy of 86-DOS 0.11 from scratch.
Source Code Reconstruction
Clearly, to build 86-DOS from scratch, we need the source code. While the original source code would be preferable, good luck finding a copy. Earlier this year, I began a project to reconstruct the source code of 86-DOS 0.11 through disassembly, and I’ll briefly discuss it here. The goal of the source reconstruction project is to create source files that reassemble back to the original binaries and look indistinguishable from the original source code.
Before I begin, I want to list all the components of 86-DOS 0.11, in case you’re not familiar with them.
- Boot Record (
BOOT) - I/O System (
DOSIO) - 86-DOS Kernel (
86DOS) - Command Interpreter (
COMMAND) - 8086 Assembler (
ASM) - Chess (
CHESS) - Line Editor (
EDLIN) - Intel HEX To Binary Conversion Utility (
HEX2BIN) - CP/M Disk Reader (
RDCPM) - System Transfer Utility (
SYS) - Z80 to 8086 Source Code Translator (
TRANS)
Alright, now let’s dive into it. I disassembled COMMAND first because when I ran it under a later version of 86-DOS, it gave me garbled output, and I wanted to figure out why.
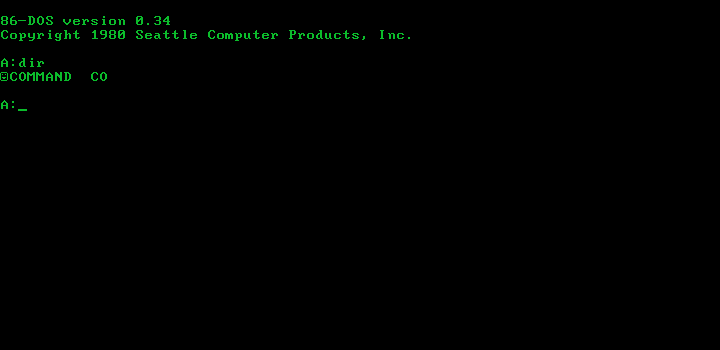
COMMAND.COM under 86-DOS 0.34, displaying a garbled directory listing.It turned out that the garbled output was caused by an API change between 86-DOS 0.11 and 86-DOS 0.34, where the Search First and Search Next functions in 0.11 returned the 16-byte directory entry of the found file, while 0.34 returned an unopened FCB.
Next, I disassembled SYS and HEX2BIN – they are the two smallest utilities. It’s interesting that SYS has the number of system sectors to transfer at location 3, possibly to allow users to patch the binary for custom disk formats.
	ORG	100H
	PUT	100H

	JMP	START

SECS:	DW	52	;Patch for different configs

START:
MOV AL,[FCB]It’s also worth noting that SYS‘ bad drive specification message does not have a terminating dollar sign. This causes the program to spew out garbage when you specify an invalid drive.
ERWRIT:	DB	"Disk write error$"
DRVBAD:	DB	"Bad drive specification"

END:Then I shared my progress and got in touch with Rich Cini, Lucas Brooks and starfrost, forming a group chat. With some help from Rich and Lucas, I managed to reconstruct the source code of the kernel. This kernel is interesting – I believe it is the only 86-DOS kernel that doesn’t use overlapping init code and data, a technique seen in later kernels to save a few bytes of memory. Something else worth mentioning is that, while I’m not 100% certain, I think the name QDOS was used in the header of the original 86DOS.A86, like this:
; QDOS  High-performance operating system for the 8086  version 0.11
; by Tim PatersonWhy? Because of this snippet from a court proceeding transcript:
Q. As I understand your testimony earlier, this term QDOS was used only internally at Seattle Computer Products?
Paterson v. Little, Brown Co. – Document 14 (Exhibit A)
A. Right. Since it appeared in the source code, however, then when other people saw the source code, it had essentially leaked out the use of that term. It was after that that I realized I needed to adjust the source code title as well.
Who leaked it? I think Microsoft did, because Microsoft used the name QDOS in their internal documents.
Anyway, we’re sidetracked. Back to the source reconstruction, the next thing I tackled was RDCPM, followed by EDLIN. RDCPM is hard-coded to handle four 8″ SSSD CP/M 2.x disks, which does not match the configuration of two 8″ drives and one 5.25″ drive (COMBCRO) used by this copy of 86-DOS. Unlike later versions of RDCPM, it does not have support for custom drive tables, and it actually initialises the allocation bitmap fields of the DPT.
IBM:
	DW	26	;Sectors per track
	DB	3	;Block shift
	DB	7	;Block mask
	DB	0	;Extent mask
	DW	242	;Disk size - 1
	DW	63	;Directory entries - 1
	DB	0C0H	;Directory allocation bitmap 0
	DB	0	;Directory allocation bitmap 1
	DW	16	;Directory check vector size
	DW	2	;Tracks to skip
DW MOD6 ;Modulo-6 sector translate tableEDLIN is interesting in that it uses INT 33 (21H) instead of the CP/M-styled CALL BDOS (5). Given that INT 21H was implemented after CALL 5, it shows that EDLIN was indeed the newest utility, written from scratch in 8086 assembly for 86-DOS.
If my memory serves me correctly, after RDCPM and EDLIN, I asked Rich to email Tim Paterson to see if he still had the original source code, but unfortunately, he didn’t. However, in his response, he said:
The Chess program was Sargon. We had it running on my Z80 computer in college ca. 1978. I used the source code translator to port it to DOS.
Tim Paterson (email exchange)
So, I obtained a copy of the Sargon Chess source code, translated it from Intel 8080 mnemonics to Zilog Z80, and then translated the Z80 source to 8086 using Paterson’s TRANS utility. It was a reasonably close match, and after a few hours of manual tweaking, I managed to produce matching binaries. However, the ATTACK routine and its subroutines didn’t match Sargon’s, and since I don’t know how to play chess, I didn’t assign meaningful label names and comments to them initially. Later, someone provided me with some pointers on the basic logic of those routines, and I finally managed to label and comment everything. Correctness? No guarantee! (If you know the x86 assembly language and how to play chess, you’re more than welcome to double-check my comments!)
Anyway, CHESS was almost a direct translation of Dan and Kathleen’s work, and the beginning of the original source code explicitly stated “No part of this publication may be reproduced without prior written permission,” so no wonder it was removed by the next release, hehe.
After CHESS, I worked on the boot record and I/O system. Existing code from 86-DOS “0.2” and 0.34 helped a lot, but the 0.11 boot record is completely different. The hundred or so bytes took me a few hours to fully understand, mostly because I had to read the manuals of the Cromemco 4FDC and the Tarbell DD disk controller. Yes, I also tried to reconstruct the Tarbell-specific code. The I/O system has a few differences compared to later I/O systems – most importantly, the cluster count for the 5.25″ format is wrong and it lacks support for fast-seek. The delays are also much longer compared to later versions of 86-DOS.
Anyway, I then made a Tarbell DD copy which worked fine under emulation, and sent that to Rich to test on his physical SCP Gazelle. It failed spectacularly. Eventually, Rich managed to find the instruction where the code locked up – INB DISK+4. The culprit was that the I/O port DISK works for both Tarbell and Cromemco, however DISK+4 works only for Cromemco, and I forgot to change it from DISK+4 to DISK when I reconstructed the Tarbell-specific code.
Next came TRANS, Paterson’s Z80 to 8086 translator. It was the easiest component to disassemble because Microsoft open-sourced the code of a later version, and the two are virtually identical. Nothing interesting here, moving on.
And we’re finally at the resident 8086 assembler, ASM. This bad boy took me an entire month because it’s huge, complex, and machine-translated. I thought it was going to be a walk in the park because the source code of a later version is available (like TRANS), but clearly, I was wrong. The open-sourced version is very different, and a lot of things have been rewritten. The version included with 86-DOS 0.11 is essentially a direct translation of the SCP 8086 Cross Assembler from Z80 to 8086, without too much clean-up or optimisation for the 8086 (this is actually a good thing, I’ll talk about it in the next section). Just to give you an idea, I worked with code like this:
CODE:12E5 loc_112E5:                              ; CODE XREF: CODE:12B1↑p
CODE:12E5                                         ; CODE:1304↓p ...
CODE:12E5                 xchg    bx, dx
CODE:12E7                 push    bx
CODE:12E8                 mov     dl, [bx]
CODE:12EA                 mov     dh, 0
CODE:12EC                 lahf
CODE:12ED                 inc     bx
CODE:12EE                 sahf
CODE:12EF                 lahf
CODE:12F0                 add     bx, dx
CODE:12F2                 rcr     si, 1
CODE:12F4                 sahf
CODE:12F5                 rcl     si, 1
CODE:12F7                 mov     dl, [bx]
CODE:12F9                 lahf
CODE:12FA                 inc     bx
CODE:12FB                 sahf
CODE:12FC                 mov     dh, [bx]
CODE:12FE                 mov     al, dl
CODE:1300                 or      al, dh
CODE:1302                 jz      short loc_11307
CODE:1304 call loc_112E5CODE:1367 loc_11367: ; CODE XREF: CODE:1381↓j
CODE:1367 lahf
CODE:1368 add bx, bx
CODE:136A rcr si, 1
CODE:136C sahf
CODE:136D rcl si, 1
CODE:136F mov al, dl
CODE:1371 adc al, al
CODE:1373 daa
CODE:1374 mov dl, al
CODE:1376 mov al, dh
CODE:1378 adc al, al
CODE:137A daa
CODE:137B mov dh, al
CODE:137D rcl cl, 1
CODE:137F dec ch
CODE:1381 jnz short loc_11367
CODE:1383 retnIf I just saw these snippets without any context, I would actually believe that they’re disassemblies of strings or random data rather than x86 machine code. So yeah, the story is they’re translated from Z80, so they have a lot of boilerplate and don’t make total… or, well, much sense at all. I have to admit that despite having written an 8086 assembler before and spending like a month on this thing, I still cannot fully understand Paterson’s code.
You can find the source code reconstruction project on my GitHub: https://github.com/TheBrokenPipe/86-DOS-0.11.
Enter CP/M Cromemco CDOS
Why am I talking about CP/M when this is a post about 86-DOS? Well, we’re building 86-DOS from scratch, and as we all know, 86-DOS did not just magically appear out of nowhere. It was actually written and built by Paterson using the Cromemco CDOS operating system.
My development process at SCP began, of course, using CP/M tools. I wrote the 8086 assembler hosted on Cromemco CDOS. I used it to write the Monitor, which lived in ROM on the CPU Support board. I used MicroPro WordMaster (not WordStar) as my editor. When bringing up DOS, I would use CP/M tools to write the binary to the first sectors of the disk, then boot it with the Monitor. The first working version of DOS was 0.10, but a bug was quickly found and 0.11 was, I think, the first released publicly.
Once DOS was fully functional, I needed a better editor to use it. I used a good Z80 disassembler on WordMaster, verifying I could rebuild it for CP/M. Then I set the translator loose on it and it was ported to DOS. So my ongoing development of DOS at SCP took place on an 8086 using my tools and the translated WordMaster. The translator was also how the assembler (and the translator) were originally ported. I’ve often though that I may the only one who took advantage of translation compatibility.
Tim Paterson (email exchange)
Before I talk about things in detail, let’s take a look at what we know so far.
- 86-DOS was assembled under CDOS.
- The SCP assembler (hereinafter referred to as ASM86) was used to assemble the source code.
- A CP/M tool was used to write the binaries to disk.
And what do we have at the moment?
- Cromemco CDOS
We’re missing ASM86, which ran under CDOS, and the CP/M tool Paterson used to write the binaries! Luckily, from Paterson’s quote above and from my experience disassembling ASM, ASM is (almost) the direct output of running TRANS on ASM86, so theoretically, the translation can be undone to obtain a copy of ASM86. In practice, it was not that straightforward.
Back to Z80
TRANS was written based on the translation rules published by Intel for the 8080 processor, so I used that as the guide for my 8086 to Z80 translator – CIS (the name CIS comes from the Latin prefix cis used in cis-trans isomerism, where cis means “this side” and trans means “the other side”).
It was a horrible experience doing the reverse of TRANS because multiple Z80 instructions can be translated into the same sequence of 8086 instructions. Therefore, the context needs to be analysed in order to determine which Z80 instruction to output. The simplest case is something like this:
	JNZ	L0002
	CALL	GETSYM		;If no tokens read yet, read first one
L0002: There are 2 possible translations:
| JR NZ,L0002 CALL GETSYM L0002: | CALL Z,GETSYM |
While the one on the left is more logical in the context of machine translation, as it’s a 1:1 mapping of 8086 instructions to Z80 instructions, the one on the right makes more sense. Should we use the left-hand side one because it’s easier? No, because we want the output Z80 code to be as readable as possible. Does that mean we use the right-hand side one? Not exactly, because in the event that some other code branches to L0002, we need to preserve the L0002 label. So, we need to scan the source code to check the number of times L0002 is referenced to determine whether the label should be kept. This is only the simplest case, there are more complex cases, and as you can imagine, the entire process wasn’t all that straightforward.
The situation was exacerbated by Paterson manually optimising some 16-bit operations to use 8086-specific features and removing redundant boilerplate. I had to deal with things like 16-bit comparisons and string operations, which were not fun at all. Did I mention shadow registers being mapped into memory? How do you tell which memory address corresponds to which register?
Look, if I wanted to delve into the details, I could probably write an entire article just on this boring stuff. So, I’m just going to end it here and say that in the end, I managed to obtain a Z80 source file that produces almost the same output as the original 8086 code when run through TRANS again. It runs and works great under CDOS.
CDOS version 02.36
Cromemco Disk Operating System
Copyright (c) 1978, 1980 Cromemco, Inc.

A.asm86 demo.bcz

Seattle Computer Products 8086 Assembler Version 1.00
Copyright 1979 by Seattle Computer Products, Inc.


Error Count =    0

A.
DOSGEN
We’re also missing the program Paterson used to write 86-DOS binaries to disk. It’s clearly Paterson’s own program, and when Rich asked Paterson himself, he said he had forgotten the details.
I don’t remember how this was done, but I can tell you how I think I would do it. Clearly there was some CP/M-based tool that let me write to absolute sectors of the disk. It wouldn’t have been hard to create a memory image by hand for the FAT and directory entries for COMMAND. This would only have to be done once to allow any number of testing iterations (which would always be rewritten in the same spot). I can imagine that RDCPM quickly became a priority, and that it was added to the initial disk the same way. Or COPY could be used on command.com to make another directory entry and allocate that amount of space.
Tim Paterson (email exchange)
So, a system transfer program from scratch it is. Based on what Paterson said, I designed it to have two modes – system transfer (similar to DOS’ SYS) and filesystem creation. The system transfer mode, like SYS, simply copies BOOT, DOSIO and 86DOS to the reserved system tracks of the destination disk, except it reads the system from the filesystem instead of the system area of an existing system disk. The filesystem creation mode additionally creates and writes a FAT image which includes the files COMMAND.COM and RDCPM.COM. This gives you the ability to create a fully bootable 86-DOS disk from scratch. RDCPM is required for transferring other files from CP/M disks once 86-DOS is booted, so it is also added to the FAT image.
DOSGEN takes the following parameters: [x:]DOSGEN y: [N]
where
| x | is an optional disk drive specifier indicating the location of the DOSGEN.COM file. This parameter is required only if the COM file is NOT located on either drive A or the current drive. Legal values are A, B, C, and D. |
| y | is a disk drive specifier indicating the disk upon which the 86-DOS system is to be written. |
N | is an optional switch indicating that a new file system is to be put on the destination disk. If this switch is specified, a file system with the files COMMAND.COM and RDCPM.COM will be written alongside the system. |
To copy 86-DOS to a new floppy disk, you must have the files BOOT.COM, DOSIO.COM and 86DOS.COM on the current drive. If a new file system is to be created, COMMAND.COM and RDCPM.COM must also exist.
Analysis of Uninitialised Data
We now have everything we need, but we’re still missing the build environment. Luckily, most 86-DOS 0.11 binaries have uninitialised data within them, and they contain information about the environment where the original copy of 86-DOS 0.11 was built.
What is Uninitialised Data
SCP’s 8086 assembler (hereinafter referred to as ASM86) supports a DS (Define Storage) pseudo-op, similar to MASM’s DB n DUP(?). Since ASM86 generates Intel HEX files, when it encounters a DS, it increments the program counter variable by the specified number of bytes, which, in turn, increases the address in the .HEX file. The same goes for specifying a custom put base, which literally tells the assembler to emit code at a specified address.
When a .HEX file is loaded, the parser reads it line by line and copies the data to the address specified at the beginning of each line. This means that if there is a gap between the addresses of two lines, which would be the case when the put base is incremented by DS or PUT, the data inside the gap will be uninitialised and, therefore, undefined.
Suppose that I originally have this data at address 0x100:
Offset(h) 00 01 02 03 04 05 06 07 08 09 0A 0B 0C 0D 0E 0F

00000100  54 68 69 73 20 66 69 6C 65 20 63 6F 6E 74 61 69  This file contai
00000110  6E 73 20 6D 79 20 70 61 73 73 77 6F 72 64 2E 20  ns my password.
00000120  4D 79 20 70 61 73 73 77 6F 72 64 20 69 73 20 61  My password is a
00000130  62 63 31 32 33 2E 20 44 6F 20 6E 6F 74 20 6C 65  bc123. Do not le
00000140  61 6B 20 74 68 69 73 21                          ak this!
Now, I load this Intel HEX file (notice the gap of 18 bytes between the second and third line):
  Len Addr Type Data                                                 Hash
: 1A  0100 00   2CC3EB8233940FDC4C1C9507C82F8C88237F9602D154EC95F3C6 2F
: 09  011A 00   041CA1DC8862B224C9                                   B6
: 13  0135 00   74CFDA5478D2CCA5C79A6D8BD6CB32629EDE90               F1
The memory then becomes this:
Offset(h) 00 01 02 03 04 05 06 07 08 09 0A 0B 0C 0D 0E 0F

00000100  2C C3 EB 82 33 94 0F DC 4C 1C 95 07 C8 2F 8C 88  ,Ãë‚3”.ÜL.•.È/Œˆ
00000110  23 7F 96 02 D1 54 EC 95 F3 C6 04 1C A1 DC 88 62  #.–.ÑTì•óÆ..¡Üˆb
00000120  B2 24 C9 70 61 73 73 77 6F 72 64 20 69 73 20 61  ²$Épassword is a
00000130  62 63 31 32 33 74 CF DA 54 78 D2 CC A5 C7 9A 6D  bc123tÏÚTxÒ̥ǚm
00000140  8B D6 CB 32 62 9E DE 90                          ‹ÖË2bžÞ.
The 18-byte buffer at offset 0x123 is what we call uninitialised data, which in this case, happens to contain the leftover string password is abc123.
Case Study: CHESS.COM
Let’s take a look at this fragment of uninitialised data at offset 0x64 of CHESS.COM. It’s only 156 bytes, but you will be surprised by the amount of information that can be inferred from these bits.
Offset(h) 00 01 02 03 04 05 06 07 08 09 0A 0B 0C 0D 0E 0F

00000060              69 6C 65 20 6E 61 6D 65 0D 0A 24 02      ile name..$.
00000070  01 43 48 45 53 53 20 20 20 48 45 58 00 00 B9 03  .CHESS   HEX..¹.
00000080  01 60 E4 0E 66 00 77 00 48 00 11 00 FF FF EB D4  .`ä.f.w.H...ÿÿëÔ
00000090  48 00 50 52 49 4C 53 54 44 4C 20 20 20 00 00 00  H.PRILSTDL   ...
000000A0  09 25 29 00 00 00 00 00 00 00 00 00 00 00 00 00  .%).............
000000B0  00 00 53 55 50 43 48 45 53 53 48 45 58 00 00 00  ..SUPCHESSHEX...
000000C0  47 7E 7F 81 82 83 84 85 86 87 00 00 00 00 00 00  G~..‚ƒ„…†‡......
000000D0  00 00 53 55 50 43 48 45 53 53 43 4F 4D 00 00 00  ..SUPCHESSCOM...
000000E0  32 88 89 8A 8B 8C 8D 8E 00 00 00 00 00 00 00 00  2ˆ‰Š‹Œ.Ž........
000000F0  00 00 44 41 4E 20 20 20 20 20 20 20 20 00 00 00  ..DAN        ...
What we first see is a string ile name\r\n$. If we examine RDCPM.COM, we will see that it has the exact same string at offset 0x1D5. So, we are probably looking at a partial memory dump of RDCPM. There is a 1-byte size difference between that copy of RDCPM.COM and 86-DOS 0.11’s RDCPM.COM, because the string ends at offset 0xE of that paragraph instead of 0xF. Since we have identified the origin of the data, we can take a look at the RDCPM source code to determine the meaning of the rest of the data.
BADFN:	DB	13,10,"Bad file name",13,10,"$"
DRIVE:	DS	1
DSTFCB:	DS	32
	DB	0
DIRBUF: DS 128The byte at 0x6F is the DRIVE variable, which holds the drive ID of the CP/M disk. A value of 0x02 signifies drive C. Next comes DSTFCB, the FCB of the destination file. We can see from the first 12 bytes that it’s the file A:CHESS.HEX. This gives us the RDCPM command line RDCPM C:CHESS.HEX A:.
If we look further at DSTFCB, we will notice that it does not actually match up with the FCB format of 86-DOS 0.11. This strongly suggests that RDCPM was run under an earlier version of 86-DOS.
After the FCB, we have DIRBUF, which holds a directory sector of the CP/M disk. We can decode it:
| Filename | Size | Blocks | Block List |
|---|---|---|---|
PRILSTDL | 1152 | 2 | 37, 41 |
SUPCHESS.HEX | 9088 | 9 | 126, 127, 129, 130, 131, 132, 133, 134, 135 |
SUPCHESS.COM | 6400 | 7 | 136, 137, 138, 139, 140, 141, 142 |
DAN | ? | ? | ? |
I have no idea what PRILSTDL was; if I had to guess, it probably had something to do with the printing of assembly language listings. SUPCHESS.HEX had the exact same size as the .HEX file for 86-DOS 0.11’s CHESS program, and SUPCHESS.COM had the same size as CHESS.COM, so the SUPCHESS thing was just CHESS. I doubt anyone will ever be able to figure out what DAN was.
The most crucial information we can infer from this directory fragment is the format of the CP/M disk in drive C. RDCPM only ever supported 2 CP/M disk formats out of the box – the standard 8″ SSSD format with a sector skew of 6, and the 5″ Cromemco format with a sector skew of 5. The largest block number for the 5″ format is about 82, so based on this alone, we can deduce that this directory fragment belonged to an 8″ disk.
Summary (TL;DR)
- The file
CHESS.HEXwas converted toCHESS.COMunder 86-DOS. RDCPMwas used to copy CHESS.HEX from a CP/M disk.- The
RDCPMcommand wasRDCPM C:CHESS.HEX A:. - The disk in drive C was a standard 8″ SSSD CP/M disk.
- Given that drive C was 8″, the drive configuration was
LARGECRO.
- Given that drive C was 8″, the drive configuration was
Case Study: SYS.COM
SYS.COM also has some uninitialised data, this time only a partial directory sector.
Offset(h) 00 01 02 03 04 05 06 07 08 09 0A 0B 0C 0D 0E 0F

00000090                             20 41 38 36 00 00 00            A86...
000000A0  2B 4C 4D 5C 68 69 6A 00 00 00 00 00 00 00 00 00  +LM\hij.........
000000B0  00 00 53 59 53 20 20 20 20 20 48 45 58 00 00 00  ..SYS     HEX...
000000C0  04 23 00 00 00 00 00 00 00 00 00 00 00 00 00 00  .#..............
000000D0  00 00 53 59 53 20 20 20 20 20 42 41 4B 00 00 00  ..SYS     BAK...
000000E0  05 26 00 00 00 00 00 00 00 00 00 00 00 00 00 00  .&..............
000000F0 00 00 43 4F 4D 4D 41 4E 44 20 48 45 58 00 00 00 ..COMMAND HEX...| Filename | Size | Blocks | Block List |
|---|---|---|---|
?.A86 | 5504 | 6 | 76, 77, 92, 104, 105, 106 |
SYS.HEX | 512 | 1 | 35 |
SYS.BAK | 640 | 1 | 38 |
COMMAND.HEX | ? | ? | ? |
There’s nothing particularly interesting here, but SYS.BAK (presumably produced by editing SYS.A86 with EDIT or WordMaster) had the exact same size as my reconstructed SYS.A86, so my SYS disassembly can’t be too far off the original. I’m not sure what that .A86 file was, but my educated guess is it was COMMAND.A86.
File Sizes and RDCPM
The size of files copied off of CP/M disks should always be multiples of the block size of the CP/M disk, because RDCPM completely ignores the record count and uses only the block pointers to determine when to stop reading. For instance, if the record size is 1K and the file size is 128, when transferred to a DOS disk with RDCPM, it will be 1024 bytes long.
Since none of the files on the original 86-DOS 0.11 distribution disk are exact multiples of 1K, none of them were directly transferred from CP/M disks. This implies that all the .COM binaries were generated by HEX2BIN from .HEX files read from CP/M disks. CHESS.DOC was either created from scratch under 86-DOS, or transferred from a CP/M disk and then edited by EDLIN under 86-DOS.
Building 86-DOS
Finally, we’re building it!
Requirements
Hardware
- A Cromemco Z-2D machine with four 8″ drives*.
- An SCP 8086 S-100 machine with the Cromemco 4FDC disk controller and four 8″ drives**.
*Greg Sydney-Smith’s fork of the Z80 simulator from z80pack can be used instead of physical hardware.
**Peter Schorn’s fork of the AltairZ80 simulator can be used instead of physical hardware.
Software
- An 8″ SSSD CDOS disk containing:
- An 8″ SSSD CDOS disk containing the 86-DOS 0.11 source code.
- An earlier version of 86-DOS or an existing copy of 86-DOS 0.11, with
LARGECROdrive config*.
*Any version of 86-DOS 0.x (including 0.11) will do. The disk controller must be Cromemco 4FDC and the drive configuration must be LARGECRO. To create a bootable copy of 86-DOS 0.11 yourself from scratch, see The Chicken and Egg Problem :: The First Egg.
Steps
- Power on the Z-2D machine and boot the CDOS disk.
- Insert the 86-DOS source code disk in drive B.
- Insert a blank formatted 8″ SSSD disk in drive C.
- For each source (
.A86) file on drive B:- Assemble to
.HEXobject by runningASM86 <name>.BCZ.
- Assemble to
- Copy
CHESS.DOCfrom drive B to drive C. - Power on the 8086 S-100 machine and boot the earlier version of 86-DOS.
- Remove the disk in drive C of the Z-2D machine and insert it into drive C of the S-100 machine.
- Insert a blank formatted 8″ SSSD disk into drive B.
- For each
.HEXfile on drive C (except for86DOS.HEX,BOOT.HEXandDOSIO.HEX):- Run
RDCPM C:<name>.HEX A:. - Run
HEX2BIN <name>.
- Run
- Run
RDCPM C:CHESS.DOC A:. - Run
EDLIN CHESS.DOCand exit with the commandE(to remove extra bytes at the end ofCHESS.DOC). - Run
ERASE ????????.HEX(to delete all.HEXfiles). - Run
ERASE CHESS.BAK(to deleteCHESS.BAK). - Run
CLEAR B:and typeY(to put a filesystem on drive B). - Copy all files from drive A to drive B (to create a “fresh” and “clean” disk).
- Remove the disk in drive B and insert it into drive D of the Z-2D machine.
- Remove the disk in drive C and insert it into drive C of the Z-2D machine.
- Go back to the Z-2D machine and change to drive C.
- For
86DOS,BOOTandDOSIO:- Run
DEBUG <name>.HEX. - Quit
DEBUGand dump the correct number of pages by runningSAVE <name>.COM <num-pages>. The number of pages is given by ⌈(NEXT– 0x100) ÷ 0x100⌉.
- Run
- Run
DOSGEN D:. - The disk in drive D now contains a complete copy of 86-DOS 0.11.
The Chicken and Egg Problem
In order to create a working copy of 86-DOS 0.11 from scratch, we need an earlier version of 86-DOS. However, we don’t have that. Of course, we could simply use the original 0.11 distribution disk, but then we face a problem: How was that distribution disk made in the first place? Maybe with a copy of 86-DOS 0.10? But then this leads to another question: How was 86-DOS 0.10 built?
You see, to build 86-DOS, you need 86-DOS, and to get 86-DOS, you need to build 86-DOS… so how was the very first copy of 86-DOS built?
The First Egg
Now, I’ll guide you through creating a minimum build of 86-DOS 0.11 without the need of another copy of 86-DOS. I call this the first “egg”.
Requirements
Same as Building 86-DOS :: Requirements.
Important
You will need to make a temporary copy of the source code disk, because you will be modifying DOSIO.A86 to use LARGECRO instead of COMBCRO.
Steps
- Power on the Z-2D machine and boot the CDOS disk.
- Insert the 86-DOS source code disk (copy) in drive B.
- Insert a blank formatted 8″ SSSD disk in drive C.
- Change to drive B and edit
DOSIO.A86to use theLARGECROdrive configuration. - For
86DOS,BOOT,COMMAND,DOSIO,HEX2BINandRDCPM:- Assemble to
.HEXobject by runningASM86 <name>.BCZ.
- Assemble to
- Change to drive C and for
86DOS,BOOT,COMMAND,DOSIO,HEX2BINandRDCPM:- Load the
.HEXobject to memory by runningDEBUG <name>.HEX. - Quit
DEBUGand dump the correct number of pages by runningSAVE <name>.COM <num-pages>. The number of pages is given by ⌈(NEXT– 0x100) ÷ 0x100⌉.
- Load the
- Insert a blank formatted 8″ SSSD disk into drive D.
- Run
DOSGEN D: N. - Pop out the disks in drives C and D, and insert them into drives C and A of the S-100 machine, respectively.
- Boot up the 8086 S-100 machine.
- Run
RDCPM C:HEX2BIN.COM A:to copyHEX2BIN.COMover. - The disk in drive A now contains a minimal build of 86-DOS 0.11, which can be used to facilitate the building of a complete copy of 86-DOS 0.11.
Conclusion
Building 86-DOS 0.11 from scratch was quite the ride! I’ve lost count of the hours I’ve poured into it, but trust me, it’s been a lot. This post barely scratches the surface, hitting just the highlights – maybe about 10% of the whole deal. The other 90%? Well, let’s just say it’s been a whole lot of boring, tedious stuff like research and reverse engineering.